This is a step-by-step guide for using the Google Colab notebook in the Quick Start Guide to run AUTOMATIC1111. This is one of the easiest ways to use AUTOMATIC1111 because you don’t need to deal with the installation.
See install instructions on Windows PC and Mac if you prefer to run locally.
Update April 2023: Google has blocked usage of Stable Diffusion with a free Colab account. You need a paid plan to use this notebook.
What is AUTOMATIC1111?
You should know what AUTOMATIC1111 Stable Diffusion WebUI is if you want to be a serious user of Stable Diffusion. You can choose not to use it. But you need to know what it can do because it is the gold standard in features, though not necessarily stability…
Stable Diffusion is a machine-learning model. By itself is not very user-friendly. You will need to write codes to use it. It’s a hassle. Most users use a GUI (Graphical User Interface) to use Stable Diffusion. Instead of writing codes, we write prompts in a text box and click buttons to generate images.
AUTOMATIC1111 was one of the first GUIs developed for Stable Diffusion. Although it associates with AUTOMATIC1111’s GitHub account, it has been a community effort to develop this software.
AUTOMATIC1111 is feature-rich: You can use text-to-image, image-to-image, upscaling, depth-to-image, and run and train custom models all within this GUI. Many of the tutorials on this site are demonstrated with this GUI.
What is Google Colab?
Google Colab (Google Colaboratory) is an interactive computing service offered by Google. It is a Jupyter Notebook environment that allows you to execute code. Google Colab is commonly used in data science, such as exploring deep learning models. It is a perfect setup for running Stable Diffusion WebUI.
They have three paid plans – Pay As You Go, Colab Pro, and Colab Pro+. I recommend using the Colab Pro plan. It gives you 100 compute units per month which are about 50 hours on a standard GPU. (It’s a steal) You can also get high-RAM machines, which are useful for using v2 models and some extensions.

With a paid plan, you have the option to use Premium GPU. It is an A100 processor. That comes in handy when you need to train Dreambooth models fast.
When you use Colab for AUTOMATIC1111, be sure to disconnect and shut down the notebook when you are done. It will consume compute units when the notebook is kept open.
You will need to sign up with one of the plans to use the Stable Diffusion Colab notebook. They have blocked the free usage of AUTOMATIC1111.
Alternatives
Think Diffusion provides fully managed AUTOMATIC1111 WebUI online as a web service. They cost a bit more than Colab, but the benefits are saving yourself the trouble of installing models and extensions and faster startup time. They offer 20% extra credit to our readers. (Affiliate link)
Step-by-step instructions to run the Colab notebook
Step 0. Sign up for one of the paid plans. (I use Colab Pro.)
Step 1. Open the Colab notebook in Quick Start Guide. You should see the notebook with the second cell below.

Step 2. Set the username and password. You will need to enter them before using AUTOMATIC11111.
Step 3. Review Save_In_Google_Drive option. Three options are available.
- Small models, images and settings: This is the recommended option. It savesLora models, embeddings, GUI Settings, and all images in your Google Drive. It will load the following models from your Google Drive.
- Models (from AI_PICS/models folder)
- Upscalers (from AI_PICS/ESRGAN folder)
- Lora models (from AI_PICS/Lora folder)
- Embeddings (from AI_PICS/embeddings folder)
- ControlNet (from AI_PICS/ControlNet folder)
2. Everything: This option saves the whole AUTOMATIC1111 Stable Diffusion webui in your Google Drive. This option requires more regular maintenance and is not recommended.
3. Nothing: Will not use your Google Drive. All data and images will be deleted after you disconnect.
You must grant permission to access Google Drive if you choose the first or the second options.
Step 4. Check the models you want to load. Currently we offer v1.4, v1.5, v1.5 inpainting, F222, anything v3, inkpunk diffusion, Mo Di diffusion, v2.1-512, v2.1-768 and v2 depth model.
If you are a first-time user, you can select the v1.5 model.

If you chose to save everything in Google Drive, the models will be downloaded to your Google Drive.
Step 6. Click the Play button on the left of the cell to start. It may warn you about needing high RAM if you don’t have a Pro subscription. Ignoring the warning is okay if you don’t use the v2.1 768 px model.
Step 7. Start-up should complete within a few minutes. How long it takes depends on how many models you include. When it is done, you should see the message below.

Step 8. Follow the gradio.live link to start AUTOMATIC1111.
Step 9. Enter the username and password you specified in the notebook.

Step 10. You should see the AUTOMATIC1111 GUI after you log in.

Put in “a cat” in the prompt text box and press Generate to test using Stable Diffusion. You should see it generates an image of a cat.

ngrok (Optional)
If you run into display issues with the GUI, you can try using ngrok instead of Gradio to establish the public connection. It is a more stable alternative to the default gradio connection.
You will need to set up a free account and get an authoken.
- Go to https://ngrok.com/
- Create an account
- Verify email
- Copy the authoken from https://dashboard.ngrok.com/get-started/your-authtoken and paste in the ngrok field in the notebook.
The Stable Diffusion cell in the notebook should look like below after you put in your ngrok authtoken.

Click the play button on the left to start running. When it is done loading, you will see a link to ngrok.io in the output under the cell. Click the ngrok.io link to start AUTOMATIC1111. The first link in the example output below is the ngrok.io link.

When you visit the ngrok link, it should show a message like below

Click on Visit Site to Start AUOTMATIC1111 GUI. Occasionally, you will see a warning message that the site is unsafe to visit. It is likely because someone used the same ngrok link to put up something malicious. Since you are the one who created this link, you can ignore the safety warning and proceed.
When you are done
When you finish using the notebook, don’t forget to click “Disconnect and delete runtime” in the top right drop-down menu. Otherwise, you will continue to consume compute credits.

Runtime type supported
You can change the runtime type by clicking Runtime -> Change Runtime type in the top menu.
GPUs and TPUs
This notebook supports the following runtime types.
- T4 GPU (recommended)
- A100 GPU
- V100 GPU
Don’t use CPU or TPU. TPU is not compatible with Stable Diffusion WebUI.
RAM
High RAM should be used.
Computing resources and compute units

To view computing resources and credits, click the downward caret next to the runtime type (E.g. T4, High RAM) on the top right. You will see the remaining compute units and usage rate.
Models available
For your convenience, the notebook has options to load some popular models. You will find a brief description of them in this section.
v1.5 models
v1.5 model

v1.5 model is released after 1.4. It is the last v1 model. Images from this model is very similar to v1.4. You can treat the v1.5 model as the default v1 base model.
v1.5 inpainting model
The official v1.5 model trained for inpainting.
Realistic Vision

Realistic Vision v2 is good for generating anything realistic, whether they are people, objects, or scenes.
F222

F222 is good at generating photo-realistic images. It is good at generating females with correct anatomy.
Caution: F222 is prone to generating explicit images. Suppress explicit images with a prompt “dress” or a negative prompt “nude”.
Dreamshaper

Dreamshaper is easy to use and good at generating a popular photorealistic illustration style. It is an easy way to “cheat” and get good images without a good prompt!
Open Journey Model

Open Journey is a model fine-tuned with images generated by Mid Journey v4. It has a different aesthetic and is a good general-purpose model.
Triggering keyword: mdjrny-v4 style
Anything v3

Anything V3 is a special-purpose model trained to produce high-quality anime-style images. You can use danbooru tags (like 1girl, white hair) in the text prompt.
It’s useful for casting celebrities to amine style, which can then be blended seamlessly with illustrative elements.
Inkpunk Diffusion

Inkpunk Diffusion is a Dreambooth-trained model with a very distinct illustration style.
Use keyword: nvinkpunk
v2 models
v2 models are the newest base models released by Stability AI. It is generally harder to use and is not recommended for beginners.
v2.1 768 model

The v2.1-768 model is the latest high-resolution v2 model. The native resolution is 768×768 pixels. Make sure to set at least one side of the image to 768 pixels. It is imperative to use negative prompts in v2 models.
You will need Colab Pro to use this model because it needs a high RAM instance.
v2.1 512 model
The v2.1-512 model is the lower-resolution version of the v2.1 model.
v2 depth model

v2 depth model extracts depth information from an input image and uses it to guide image generation. See the tutorial on depth-to-image.
SDXL model

This Coalb notebook supports SDXL 1.0 base and refiner models.
Select SDXL_1 to load the SDXL 1.0 model.
Important: Don’t use VAE from v1 models. Go to Settings > Stable Diffusion. Set SD VAE to AUTOMATIC or None.
Check out some SDXL prompts to get started.
Other models
Here are some models that you may be interested in.
See more realistic models here.
Dreamlike Photoreal

Dreamlike Photoreal Model Page
Model download URL
https://huggingface.co/dreamlike-art/dreamlike-photoreal-2.0/resolve/main/dreamlike-photoreal-2.0.safetensorsDreamlike Photoreal model is good at generating beautiful females with correct anatomy. It is similar to F222.
triggering keyword: photo
Caution: This model is prone to generating explicit photos. Suppress explicit images with a prompt “dress” or a negative prompt “nude”.
Lyriel

Lyriel excels in artistic style and is good at rendering a variety of subjects, ranging from portraits to objects.
Model download URL:
https://civitai.com/api/download/models/50127Deliberate v2

Deliberate v2 is a well-trained model capable of generating photorealistic illustrations, anime, and more.
Model download URL
https://civitai.com/api/download/models/15236Save in Google Drive – Small models, images and settings
I recommend this to most users. This is designed to save small data files to Google Drive but download big files. So your Google Drive won’t be used up by Stable Diffusion.
You select Small models, images and settings option. The following are saved in your Google Drive.
- All generated images
- GUI settings
- Prompt and parameters used in the last generated image
- Embeddings (Path: AI_PICS/embeddings)
- Lora models (Path: AI_PICS/Lora)
- Upscalers (Path: AI_PICS/ESRGAN)
- Hypernetworks (Path: AI_PICS/hypernetworks)
Next time you run the notebook, all of the above will be available.
This option will not save any models in your Google Drive. But it will load all the models you put in AI_PICS/models.
You only need to put models you frequent but NOT in the Notebook’s model list in AI_PICS/models. Since model files are large (2 to 7 GB), you don’t want to put too many in your Google Drive. (Free storage of Google Drive is only 15 GB)
Installing embeddings
Embeddings are lightweight files used to modify styles or inject objects. To install embeddings, drag and drop the file to stable-diffusion-webui > embeddings.

Embeddings are reloaded whenever you switch models. You will get a confirmation in the log message on Colab.

Installing LoRA
LoRA (Low-Rank Adaptation) models are small patches that can be applied to the model checkpoints. Their sizes are small, usually between 3-200 MB, making them easy to store. They are good alternatives to models.
To install a LoRA model, drag and drop the model to the directory stable-diffusion-webui > models > Lora in the file explorer panel.

The LoRA model will be saved to your Google Drive under AI_PICS > Lora if Use_Google_Drive is selected. You can reuse the model next time if you select the same option.
Alternatively, you can put a Lora model in your Google Drive in AI_PICS > Lora if you use the google drive option. It uploads faster this way.
Installing Upscalers
You can use upscalers in your Google Drive. Just put them in AI_PICS > ESRGAN folder in your Google Drive. Next time when you start the notebook with the Use_Google_Drive option.
Using models in Google Drive
You can use models in your Google Drive. You must put the models in the following default location.
AI_PICS/modelsAll models within this folder will be loaded during start-up.
Installing hypernetworks
To install hypernetworks, put them in the following location
AI_PICS/hypernetworksSave in Google Drive – Everything
This option is NOT recommended because it occasionally causes errors. If you see an error, remove the whole folder stable-diffusion-webui in your Google Drive and start the notebook again.
This option saves the whole Stable Diffusion Webui folder in your Google Drive. The default location is AI_PIC > stable-diffusion-webui. Installing models is no different from Windows or Mac. Below are the folder paths
- Models: AI_PICS/stable-diffusion-webui/models/Stable-diffusion
- Upscalers: AI_PICS/stable-diffusion-webui/models/ESRGAN
- Lora: AI_PICS/stable-diffusion-webui/models/Lora
- Embeddings: AI_PICS/stable-diffusion-webui/embeddings
- Hypernetworks: AI_PICS/stable-diffusion-webui/hypernetworks
Installing a model from URL
You can install models from URLs using the Model_from_URL field.
Installing a model from Civitai
You need the model download link. Right-click the Download button and then Copy Link Address to get the link.

Put it in the Model_from_URL field.
Installing a model from HuggingFace
Below’s an example input for installing DreamShaper from HuggingFace
https://huggingface.co/Lykon/DreamShaper/resolve/main/Dreamshaper_3.32_baked_vae_clip_fix_half.ckpt(Link may not be correct as this model is updated frequently)
Saving a copy in Google Drive
You can optionally save a copy of the models in your Google Drive using Save_a_copy_in_Google_Drive. They will be saved in the model loading location. AI_PICS/models.
The next time you start the notebook, the models you saved in Google Drive will be automatically loaded.
Use this option only when you use the recommended setting: Save small models and images in Google Drive.
Installing extensions from URL
You can install any number of extensions by using this field. You will need the URL of the Github page of the extension.
For example, put in the following if you want to install the Civitai model extension.
https://github.com/civitai/sd_civitai_extensionYou can also install multiple extensions. The URLs need to be separated with commas. For example, the following URLs install the Civitai and the multi-diffusion extensions.
https://github.com/civitai/sd_civitai_extension,https://github.com/pkuliyi2015/multidiffusion-upscaler-for-automatic1111Extra arguments to webui
You can add extra arguments to the Web-UI by using the Extra_arguments field.
For example, if you use the lycoris extension, it is handy to use the extra webui argument --lyco-dir to specify a custom lycoris model directory in your Google Drive.
Other useful arguments are
--api. Allow API access. Useful for some applications, e.g. the PhotoShop Automatic1111 plugin.
Instruct-Pix2Pix

Instruct-Pix2Pix is a Stable Diffusion model that lets you edit photos with text instruction alone.
To use the instruct-Pix2Pix model, check the instruct_pix2pix_model checkbox. Follow the instructions in this tutorial.
Version
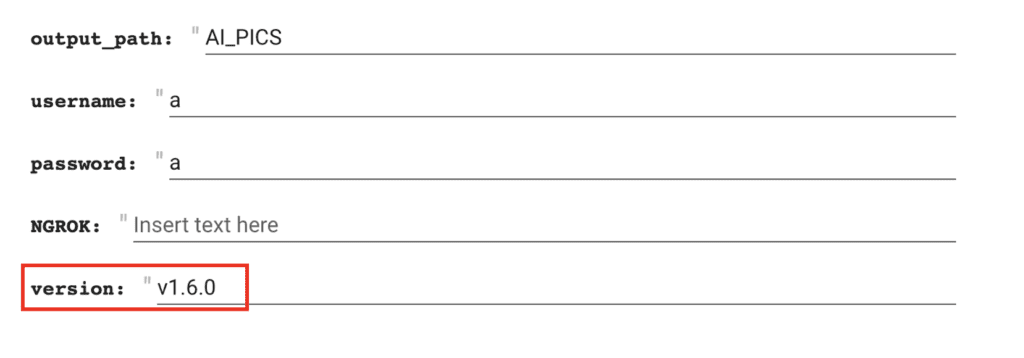
Now you can specify the version of Stable Diffusion WebUI you want to load. Use this at your own risk, as I only test the version saved.
Notes on some versions
v1.6.0: You need to add--disable-model-loading-ram-optimizationin the Extra_arguments field.
Extensions
ControlNet

ControlNet is a Stable Diffusion extension that can copy the composition and pose of the input image and more. ControlNet has taken the Stable Diffusion community by storm because there is so much you can do with it. Here are some examples
This notebook supports ControlNet. See the tutorial article.
You can put your custom ControlNet models in AI_PICS/ControlNet folder.
Deforum – Making Videos using Stable Diffusion
You can make videos with text prompts using the Deforum extension. See this tutorial for a walkthrough.
Regional Prompter
Regional prompter lets you use different prompts for different regions of the image. It is a valuable extension for controlling the composition and placement of objects.
After Detailer


After Detailer (!adetailer) extension fixes faces and hands automatically when you generate images.
Openpose editor
Openpose editor is an extension that lets you edit the openpose control image. It is useful for manipulating the pose of an image generation with ControlNet. It is used with ControlNet.
AnimateDiff

AnimateDiff lets you create short videos from a text prompt. You can use any Stable Diffusion model and LoRA. Follow this tutorial to learn how to use it.
text2video

Text2video lets you create short videos from a text prompt using a model called Modelscope. Follow this tutorial to learn how to use it.
Frequently asked questions
Do I need a paid account to use the notebook?
Yes, you need a paid account to use this notebook. Google has blocked the free usage of Stable Diffusion.
Is there any alternative to Google Colab?
Yes, Think Diffusion provides fully-managed AUTOMATIC1111 WebUI online as a web service. They offer 20% extra credit to our readers. (Affiliate link)
Do I need to use ngrok?
You don’t need to use ngrok to use the Colab notebook. In my experience, ngrok provides a more stable connection between your browser and the GUI. If you experience issues like buttons not responding, you should try ngrok.
Why do I keep getting disconnected?
Two possible reasons:
- There’s a human verification shortly after starting each Colab notebook session. You will get disconnected if you do not respond to it. Make sure to switch back to the Colab notebook and check for verification.
- You are using a free account. Google has blocked A1111 in Colab. Get Colab Pro.
Is saving everything in Google Drive faster?
The first time is slower because you need to download things to your Google Drive, which has a slower speed. Later times range from 20% faster to 50% slower. This has something to do with the speed of accessing data in Google Drive.
Can I use the dreambooth models I trained?
Yes. Models typically need to be converted to be used in AUTOMATIC1111. But if you use the notebook in my Dreambooth tutorial, it has already been converted for you.
You will need to select save “small models, images and settings” in Google Drive option. Put your dreambooth model in AI_PICS/models. You can rename the model file if desired.
How to enable API?
You can use AUMATIC1111 as an API server. Add the following to Extra Web-UI arguments.
--apiThe server’s URL is the same as the one you access the Web-UI. (i.e. the gradio or ngrok link)
Why do my SDXL images look garbled?
Check to make sure you are not using a VAE from v1 models. Check Settings > Stable Diffusion > SD VAE. Set it to None or Automatic.
Next Step
If you are new to Stable Diffusion, check out the Absolute beginner’s guide.